Using Docker for Automation Testing
- Sneha Moorthy
- Jul 27, 2021
- 3 min read
Updated: Jul 30, 2021
What is Docker?
Docker is a Platform as a Service that provides OS-level virtualization. It makes it easy to create, deploy, and run applications using containers. Containers act as a freshly installed OS, each with its own software, libraries, and configurations.
They communicate with each other through well-defined channels. Docker helps with the creation of these containers over your own Operating System. While “Docker Engine” software hosts the containers.
What are images and containers in docker?
In Docker, everything is based on images. Images are lightweight, standalone, executable packages of software that are equipped with everything needed to run an application.
A container, on the other hand, are a runtime instance of the image, i.e container images become containers at runtime.
Installing Docker
Go on Docker Docs
Check if your system supports Docker by going through the hardware prerequisites.

Download and install Docker
Once installed you will see the icon on your system, click on the icon and it will appear in your task manager.
The initial status will be Docker Desktop is starting and eventually, it will turn to Docker Desktop Running.
To confirm, run $docker --version in command prompt.
Exploring DockerHub
DockerHub is a service provided by Docker for finding and sharing container images with your team. You can sign up for it here.
It provides the following major features:
Repositories: Repositories push and pull container images.
Teams and Organisations: This feature allows you to manage access to private repositories of container images.
Official Images: Official images pull and use high-quality container images provided by Docker.
Publisher Images: Publisher images pull and use high-quality container images provided by external vendors.
Builds: Automatically build container images from GitHub and Bitbucket and push them to Docker Hub with Builds.
Webhooks: Trigger actions after a successful push to a repository to integrate DockerHub with other services using Webhooks.

Setting up Docker Container for automation tests
1 Getting Selenium images
Selenium, to make our jobs easier, has already put all selenium-related images on Docker Hub. We can directly pull the images from Dockerhub and use those in our machines.
2 Download image into our machine
Here are some important commands to keep in mind.
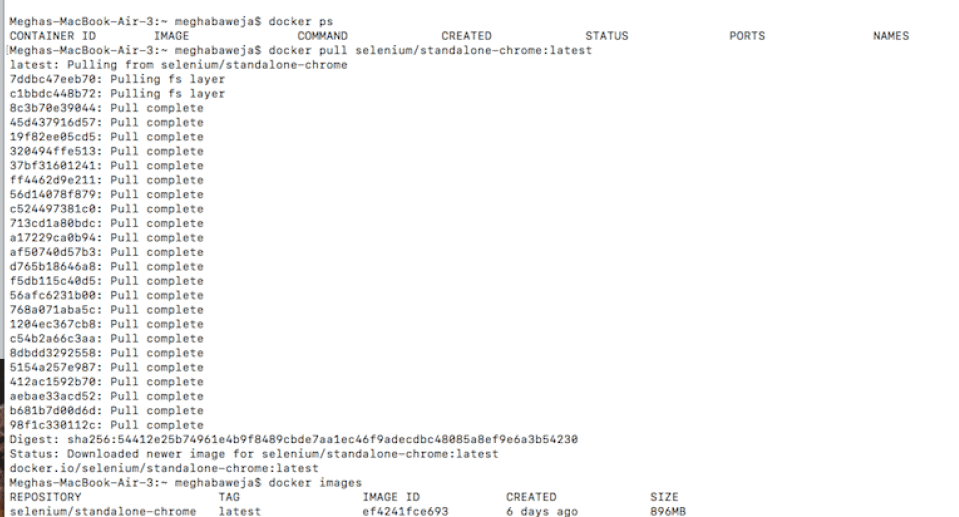
To check if you already have any containers running
$docker ps
To pull an image
$docker pull <image name=""></image>
Example:
docker pull selenium/standalone-chrome
To list out the images
$docker images

3 Deploy image to the container
$ docker run -d -p 4444:4444 -v /dev/shm:/dev/shm selenium/standalone-chrome:latest
Explanation
docker run:
Starts a new container in the machine
-d:
Runs the container in the background
-p 4444:4444:
Running port for test cases in local: container port
Essentially, it redirects all the test case runs to the container
-v /dev/shm:/dev/shm:
To use hosts shared memory
selenium/standalone-chrome:
Image name
latest:
Image version

We can use similar steps to create containers for other browsers as well.
Tip for you: Remember that only one container can run on a port at one time
4 Stop the container
$docker stop <container id=""></container>
Docker + Selenium (testNG)
In order to run test cases remotely, we need to import the RemoteWebdriver class. This class takes the URL of 2 arguments (port in which test case will be running) and desired capabilities (browser).
This is a simple test case that will run in the container we created above.

Docker + Selenium Grid
Selenium grid is a tool that helps to run our test cases in different operating systems and on different browsers.
It follows Hub and node architecture as shown in the image below. There is a common Hub to which all the nodes are connected. The main disadvantage of this is that we need many Virtual Machines for this.
By using docker with Selenium Grid, instead of VM’s we will use containers and all the nodes will be on the same OS.

How to create a hub and node -- Docker compose file?
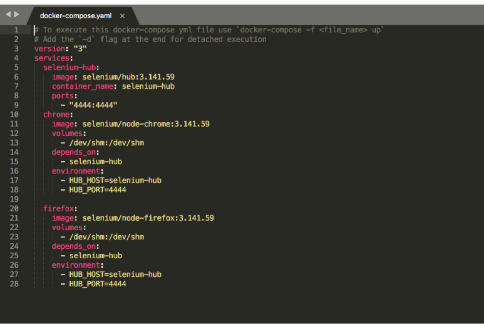
We can directly create nodes and hubs required using a single file called the “Docker compose file,” which is saved under the .yaml extension.
You have to deploy selenium/hub as the image in the container to create a hub in this file.
Then we have 2 nodes for each browser in our example- one for chrome and the other for Firefox. They both are connected to the hub using depends_on.

Save this file on your system and go to the path on cmd and run the given command:
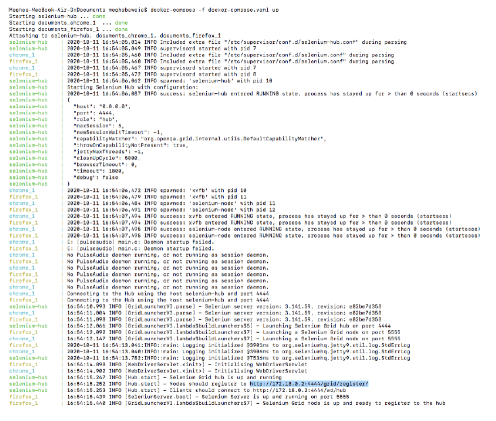
$docker-compose -f <file_name> up</file_name>
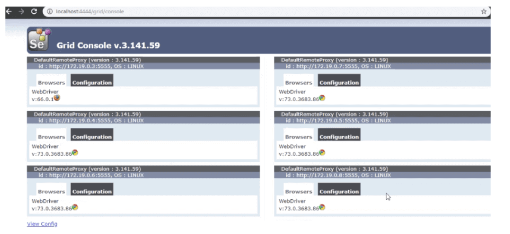
To validate that the nodes are up and running, go to the URL given under Nodes should register in the above image after we run the docker-compose file.


Now, if you wish to run 3 test cases on chrome but there is a single chrome node we can run the command below to scale up the nodes and make it to 5 nodes.
$docker-compose scale=5
Now, all the test cases will run on different nodes at the same time hence saving time for Execution.


Do more with Docker x Selenium
This fusion of Docker with selenium can help automation testers in a couple of ways. You can use Docker to:
Run test cases on your systems if you don’t have the architecture you need
Run automation test cases in parallel on various browsers
Eliminate the need to manage jars and downloading
Run tests at a scale due to its ease and flexibility
Comments